domingo, 28 de janeiro de 2024

Kunyu - More Efficient Corporate Asset Collection


0x00 Introduce

Tool introduction

Kunyu (kunyu), whose name is taken from , is actually a professional subject related to geographic information, which counts the geographic information of the sea, land, and sky. The same applies to cyberspace. The same is true for discovering unknown and fragile assets. It is more like a cyberspace map, which is used to comprehensively describe and display cyberspace assets, various elements of cyberspace and the relationship between elements, as well as cyberspace and real space. The mapping relationship. So I think "Kun Yu" still fits this concept.

Kunyu aims to make corporate asset collection more efficient and enable more security-related practitioners to understand and use cyberspace surveying and mapping technology.


Application scenario

For the use of kunyu, there can be many application scenarios, such as:

  • Forgotten and isolated assets in the enterprise are identified and added to security management.
  • Perform quick investigation and statistics on externally exposed assets of the enterprise.
  • Red and blue are used against related requirements, and batch inspections of captured IPs are performed.
  • Collect vulnerable assets in batches (0day/1day) for equipment and terminals within the impact.
  • Information on sites involved in new-type cybercrime cases is quickly collected and merged for more efficient research, judgment, and analysis.
  • Statistic and reproduce the fragile assets on the Internet that are affected by related vulnerabilities.

0x01 Install

Need Python3 or higher support

git clone https://github.com/knownsec/Kunyu.git
cd Kunyu
pip3 install -r requirements.txt

Linux:
python3 setup.py install
kunyu console

Windows:
cd kunyu
python3 console.py

PYPI:
pip3 install kunyu

P.S. Windows also supports python3 setup.py install.

0x02 Configuration instructions

When you run the program for the first time, you can initialize by entering the following command. Other login methods are provided. However, it is recommended to use the API method. Because the user name/password login requires an additional request, the API method is theoretically more efficient.

kunyu init --apikey <your zoomeye key> --seebug <your seebug key>


You need to log in with ZoomEye credentials before using this tool for information collection.

Visit address: https://www.zoomeye.org/

The output file path can be customized by the following command

kunyu init --output C:\Users\风起\kunyu\output


0x03 Tool instructions

Detailed command

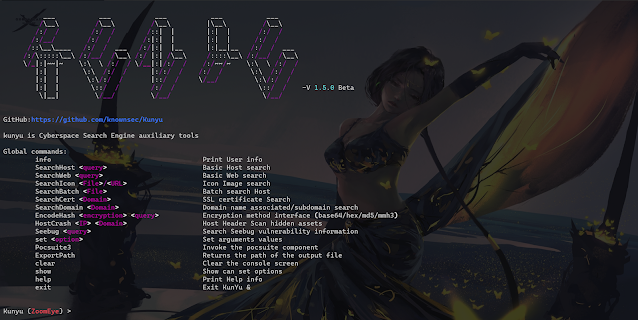
kunyu console


ZoomEye

Encryption method interface HostCrash <IP> <Domain> Host Header Scan hidden assets Seebug <Query> Search Seebug vulnerability information set <Option> Set arguments values Pocsuite3 Invoke the pocsuite component ExportPath Returns the path of the output file clear Clear the console screen show Show can set options help Print Help info exit Exit KunYu & ">
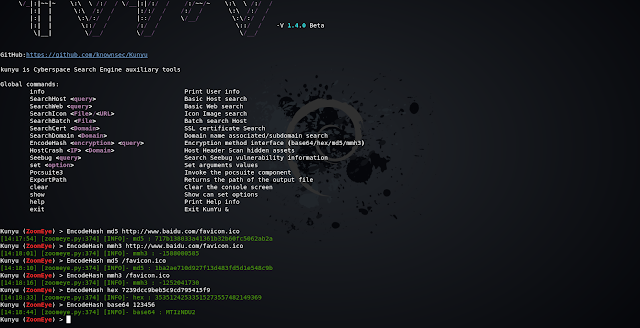
Global commands:
info Print User info
SearchHost <query> Basic Host search
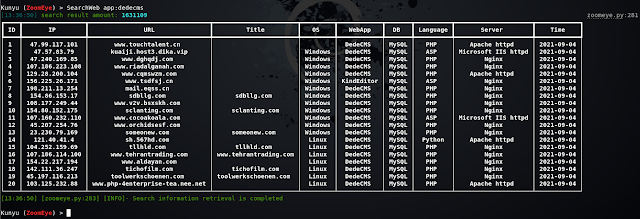
SearchWeb <query> Basic Web search
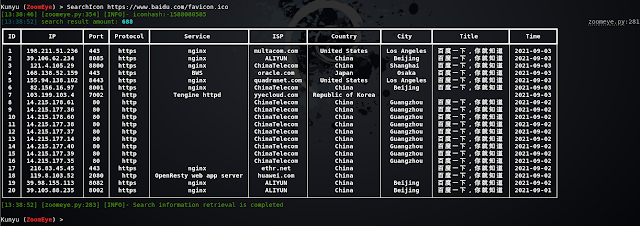
SearchIcon <File>/<URL> Icon Image search
SearchBatch <File> Batch search Host
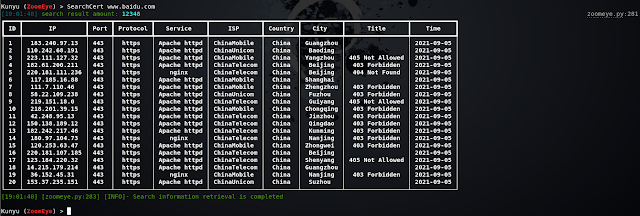
SearchCert <Domain> SSL certificate Search
SearchDomain <Domain> Domain name associated/subdomain search
EncodeHash <encryption> <query> Encryption method interface
HostCrash <IP> <Domain> Host Header Scan hidden assets
Seebug <Query> Search Seebug vulnerability information
set <Option> Set arguments values
Pocsuite3 Invoke the pocsuite component
ExportPath Returns the path of the output file
clear Clear the console screen
show Show can set options
help Print Help info
exit Exit KunYu &

OPTIONS

ZoomEye:
page <Number> The number of pages returned by the query
dtype <0/1> Query associated domain name/subdomain name
btype <host/web> Set the API interface for batch query

Use case introduction

Here we use the ZoomEye module for demonstration

User information query


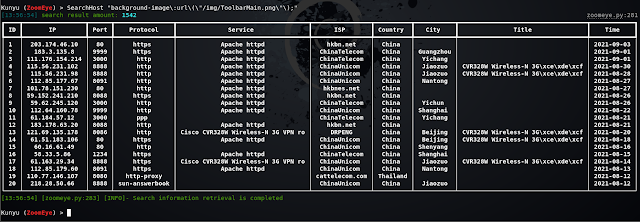
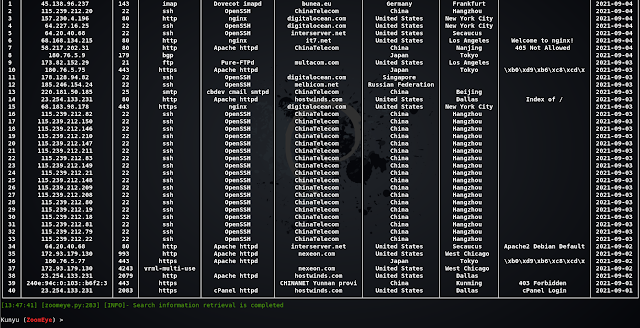
HOST host search


Web host search


Batch IP search


Icon Search

When collecting corporate assets, we can use this method to retrieve the same ico icon assets, which usually has a good effect when associating related corporate assets. But it should be noted that if some sites also use this ico icon, irrelevant assets may be associated (but people who are bored with other people's ico icons are always in the minority). Support url or local file search.


SSL certificate search

Query through the serial number of the SSL certificate, so that the associated assets are more accurate, and services that use the same certificate can be searched. When you encounter an https site, you can use this method.


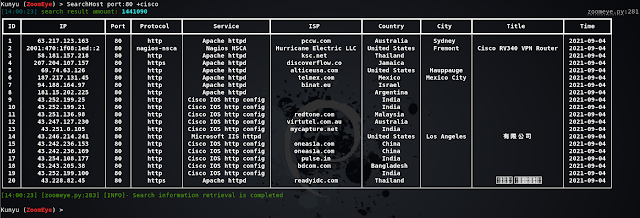
Multi-factor query

Similarly, Kunyu also supports multi-factor conditional query related assets, which can be realized through ZoomEye logic operation syntax.


Feature Search

Through HTTP request packet features or website-related features, the same framework assets can be concatenated more accurately


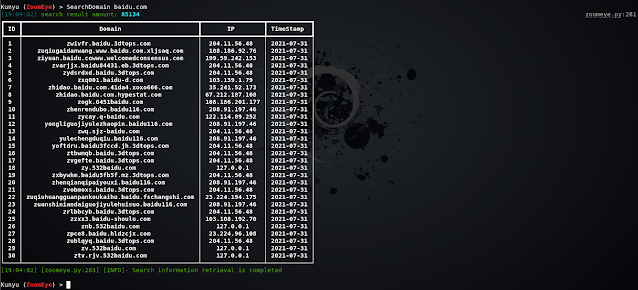
Associated Domain/Subdomain Search

Search for associated domain names and subdomains, and query associated domain names by default. Two modes can be set by setting the dtype parameter.


Encoding hash calculation

In some scenarios, you can use this command to perform common HASH encryption/encoding, such as BASE64, MD5, mmh3, HEX encoding, and debug in this way.


Seebug vulnerability query

You can query historical related vulnerabilities by entering information about the framework and equipment you want to find, but you need to note that only English is supported, and improvements and upgrades will be made later.


Setting parameters

When set page = 2, the returned results are 40. You can modify the page parameter to set the number of pages to be queried. Note that 1 page = 20/items. You can modify the value according to your needs to get more returned results.

The configurable parameters and the current values of the parameters are displayed through show.


Pocsuite linkage

In versions after v1.3.1, you can use kunyu to link the console mode of pocsuite3 for integrated use.


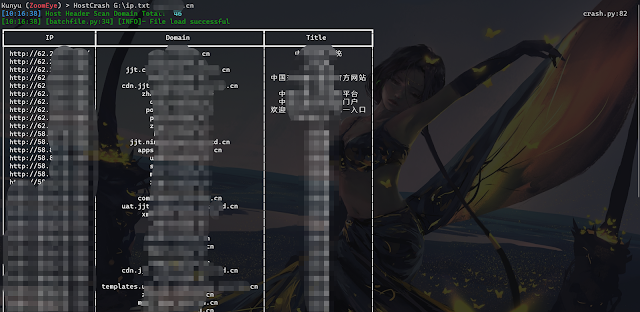
HOSTS head collision

Through the HOSTS collision, the hidden assets in the intranet can be effectively collided, and the intranet service can be accessed according to the ServerName domain name and IP configured in the middleware httpf.conf. This can be achieved by setting the local hosts file later, because the local hosts file takes precedence. The level is higher than DNS server resolution. Support reverse check through ZoomEye domain name library or read TXT file to get the list of domain names.

HOSTS cross collision


Data result

All search results are saved in the user's root directory, and the directory is created based on the current timestamp. All query results of a single start are stored in an Excel format under one directory, giving a more intuitive experience. The output path can be returned through the ExportPath command.


0x04 Loading

​ In fact, there are still many ideas, but as an Alpha version, this is the case, and it will continue to be improved in the later period. I hope that Kunyu can be known to more security practitioners. Thank you for your support.

​ The tool framework has reference to Kunlun Mirror and Pocsuite3, which are all very good works.

​ Thanks to all the friends of KnownSec 404 Team.

" 看得清 " 是能力的体现,是 " 器 " ,而 " 看得见 " 就是思想的体现,那最后关联的是 " 道 "。

​ --SuperHei


0x05 Issue

1、Multi-factor search

ZoomEye search can use multi-factor search, dork:cisco +port:80 (note the space) can search all data that meet the conditions of cisco and port:80, if there is no space in between, it is the same search condition, it is that cisco is satisfied and the port is All data for 80. Kunyu's dork does not require quotation marks.

2、High-precision geographical location

ZoomEye gives privileged users high-precision geographic location data, but it should be noted that ordinary users do not have this function, so I hope you know.

3、Username/password login

If you use username/password as the initialization condition, the token will be valid for 12 hours. If you find that your search cannot return data, you may wish to info. If the session times out, the initialization command prompt will be returned. In most cases, we recommend that you use the API KEY method, there is no invalidation problem. This design is also for the security of your account and password. After all, the API KEY can be reset and the token will become invalid. However, with the account and password, it is possible to log in to your ZoomEye account.

4、Cert certificate search

It should be noted that, according to the normal logic, you need to encode the serial number of the target SSL certificate in hexadecimal to match the sentence search, but Kunyu only needs to provide the Domain address to search. The principle is to make a request to the target station to obtain the serial number and process it, but if your host cannot access the target that needs to be searched, it cannot be retrieved. At this time, you can also search with the sentence in the usual way.

5、Favicon icon search

ico icon search not only supports URL retrieval, but also supports local ico icon file search, which has better scalability and compatibility.

6、Query data save path

By default, your query data is in the Kunyu folder under the user directory. You can also use the ExportPath command to query the path in the console mode.

7、Autocomplete

Kunyu's auto-completion supports upper and lower case, command logging, etc., use Tab to complete, please refer to Metasploit for usage.

8. Regarding the error when using pip install kunyu

The following error was reported when using pip install kunyu: File "C:\Users\风起\AppData\Local\Programs\Python\Python37\Scripts\kunyu-script.py", line 1 SyntaxError: Non-UTF-8 code starting with'\xb7' in file C: \Users\风起\AppData\Local\Programs\Python\Python37\Scripts\kunyu-script.py on line 1, but no encoding declared; see http://python.org/dev/peps/pep-0263/ for details

solution: Modify the C:\Users\风起\AppData\Local\Programs\Python\Python37\Scripts\kunyu-script.py file and add # encoding: utf-8 at the beginning of the file.

Then save it and you can use it normally. The bug appears because there is a Chinese name in the user's directory path, which usually appears on windows.

9. Pocsuite3 module POC storage directory

When using the pocsuite3 module, if you want to add a new POC module, you can add a POC file in project directory/kunyu/pocs/.

10. Pocsuite3 module POC missing issue

When using the Pocsuite command linkage, if it is a packaged Kunyu version, the poc has been fixed. At this time, modifying the poc directory cannot add new modules. At this time, you can repackage it or use the project directory/kunyu /console.py Run kunyu to update the poc module in real time.


0x06 Contributions

风起@knownsec 404
wh0am1i@knownsec 404
fenix@knownsec 404
0x7F@knownsec 404


0x07 Community

If you have any questions, you can submit an issue under the project, or contact us through the following methods.

Scan the QR code to add the ZoomEye staff member WeChat, and remark Kunyu, which will draw everyone to the ZoomEye cyberspace surveying and mapping exchange group


Related links


  1. Hack Tools For Games
  2. Hack Tools For Windows
  3. Pentest Tools Find Subdomains
  4. Install Pentest Tools Ubuntu
  5. Hacker Tools Free Download
  6. Pentest Tools Website Vulnerability
  7. Blackhat Hacker Tools
  8. Pentest Tools Apk
  9. Game Hacking
  10. Hacking Tools Name
  11. Best Hacking Tools 2019
  12. Pentest Box Tools Download
  13. Pentest Automation Tools
  14. Pentest Tools List
  15. Computer Hacker
  16. Android Hack Tools Github
  17. Hacking Tools Free Download
  18. Hack Tools For Games
  19. Pentest Tools Github
  20. Hacker Tools Apk Download
  21. Hacker Tools Mac
  22. Pentest Tools Alternative
  23. Pentest Tools Bluekeep
  24. Tools 4 Hack
  25. Pentest Tools Download
  26. Wifi Hacker Tools For Windows
  27. Termux Hacking Tools 2019
  28. Hack Tools
  29. Hacker Tools Linux
  30. Pentest Tools List
  31. Hacking Tools Kit
  32. Pentest Tools Subdomain
  33. World No 1 Hacker Software
  34. Pentest Tools Alternative
  35. Pentest Tools Apk
  36. Game Hacking
  37. Hackers Toolbox
  38. Pentest Tools Port Scanner
  39. Hack Tools For Mac
  40. Pentest Tools Nmap
  41. Nsa Hack Tools
  42. Hacking Tools Github
  43. Pentest Tools List
  44. Hacker Tools Windows
  45. Hack Tools
  46. Pentest Tools Nmap
  47. Bluetooth Hacking Tools Kali
  48. New Hacker Tools
  49. Hacking Tools For Pc
  50. Pentest Reporting Tools
  51. Hacker Tools List
  52. Hack Tools For Mac
  53. Hacker Tools Linux
  54. Hack Tool Apk No Root
  55. Hacker Tools 2019
  56. Hack Tool Apk No Root
  57. Pentest Tools Framework
  58. Hacking Tools Online
  59. Pentest Tools For Windows
  60. Best Hacking Tools 2020
  61. Pentest Tools Free
  62. Pentest Tools Review
  63. Hacker Tools Apk Download
  64. Pentest Tools Apk
  65. Hack Tools For Pc
  66. Hack Tools Download
  67. Termux Hacking Tools 2019
  68. Pentest Tools Apk
  69. Tools For Hacker
  70. Hack Tools
  71. New Hack Tools
  72. Computer Hacker
  73. Physical Pentest Tools
  74. Hacking Tools For Mac
  75. Android Hack Tools Github
  76. Pentest Tools For Android
  77. Hack Tools Github
  78. Pentest Tools
  79. Pentest Tools Nmap
  80. Hack Tools For Mac
  81. Pentest Tools Kali Linux
  82. Hacker Tools Linux
  83. Hacking Tools Kit
  84. Wifi Hacker Tools For Windows
  85. Hacking Tools 2020
  86. Hack Tool Apk
  87. Hacker Tools
  88. Hacking Tools Hardware
  89. Hack Tools For Games
  90. Nsa Hacker Tools
  91. Hacker Tools Github
  92. Hacker Tools List
  93. Hacking Tools And Software
  94. Hacker Tools Free
  95. Hacker Tools List
  96. Hacker Tool Kit
  97. Hack Website Online Tool
  98. Best Hacking Tools 2020
  99. Hackrf Tools
  100. Hacking Tools For Mac
  101. Hack Tools Pc
  102. Pentest Tools Nmap
  103. Hack App
  104. Pentest Tools Subdomain
  105. Hack Tools For Windows
  106. Pentest Tools Port Scanner
  107. Top Pentest Tools
  108. Pentest Tools Windows
  109. Hacker Tools List
  110. Hacker Tools For Pc
  111. New Hack Tools
  112. Hacking Tools For Kali Linux
  113. Hacker Tools Hardware
  114. Hack Tools Mac
  115. Hack Tool Apk No Root
  116. Hacking Tools Mac
  117. Hacker Search Tools
  118. Hacker Search Tools
  119. Pentest Reporting Tools
  120. Pentest Tools Apk
  121. Hack Tools
  122. Pentest Tools Apk
  123. Hacking Tools Download
  124. Hackrf Tools
  125. Hack Tools For Mac
  126. Termux Hacking Tools 2019
  127. What Are Hacking Tools
  128. Pentest Reporting Tools
  129. Hack Tool Apk No Root
  130. Hacking Tools Mac
  131. Pentest Tools For Mac
  132. Hacker Tools For Windows
  133. Hacker Tools Github
  134. Pentest Tools Nmap
  135. Hacker Tools Github
  136. Pentest Tools Url Fuzzer
  137. Hacking Tools For Beginners
  138. Nsa Hack Tools
  139. Hacker Tools Linux
  140. Hack App
  141. Hacker Security Tools
  142. Tools 4 Hack
  143. Blackhat Hacker Tools
  144. Pentest Tools Subdomain
  145. Pentest Tools Tcp Port Scanner
  146. Pentest Tools Website
  147. Nsa Hack Tools Download
  148. Best Hacking Tools 2019

DeepEnd Research: Analysis Of Trump's Secret Server Story


 We posted our take on the Trump's server story. If you have any feedback or corrections, send me an email (see my blog profile on Contagio or DeepEnd Research)

Analysis of Trump's secret server story...


Related links
  1. Pentest Tools Subdomain
  2. World No 1 Hacker Software
  3. Hack Website Online Tool
  4. Hack Tools Pc
  5. Hacking Apps
  6. Hacker Tools For Windows
  7. Hack Tools For Ubuntu
  8. New Hacker Tools
  9. Hack Tools 2019
  10. Top Pentest Tools
  11. Pentest Tools Alternative
  12. Best Pentesting Tools 2018
  13. Hacking Tools Software
  14. Pentest Tools For Ubuntu
  15. How To Make Hacking Tools
  16. Pentest Tools Android
  17. Hack Tools For Pc
  18. Pentest Tools Github
  19. Hack App
  20. Pentest Tools Find Subdomains
  21. Hacking Tools Name
  22. Nsa Hacker Tools
  23. Tools Used For Hacking
  24. Best Hacking Tools 2019
  25. What Is Hacking Tools
  26. Pentest Tools Url Fuzzer
  27. Hacker Tools 2019
  28. Pentest Tools Nmap
  29. Hack App
  30. Hacker Tools Free
  31. Hacking Tools Download
  32. Hacking Tools Kit
  33. Hack Apps
  34. Hack Tools For Ubuntu
  35. Hacker Tools Linux
  36. Hacker Tools Linux
  37. Hacker Techniques Tools And Incident Handling
  38. Hacker Tools Linux
  39. Hacking Tools Free Download
  40. Android Hack Tools Github
  41. Hacks And Tools
  42. Hacking Tools For Games
  43. Hacker Tools Apk Download
  44. Hacking Tools Pc
  45. Hacker Tools Apk
  46. Hacker Techniques Tools And Incident Handling
  47. Hacking Tools Kit
  48. Pentest Tools Framework
  49. Hacking App
  50. Hacker Tools
  51. Pentest Tools For Windows
  52. Hack Tools For Mac
  53. Hacker Tools Windows
  54. Bluetooth Hacking Tools Kali
  55. Pentest Tools For Mac
  56. Pentest Tools Bluekeep
  57. Hacker Tools 2020
  58. Hacking Tools Usb
  59. Install Pentest Tools Ubuntu
  60. Pentest Tools For Windows
  61. Nsa Hacker Tools
  62. Hacking Tools 2019
  63. Pentest Tools Website
  64. Hacking Tools For Windows Free Download
  65. Nsa Hacker Tools
  66. Hack Website Online Tool
  67. Pentest Tools Android
  68. Hacker Tools Linux
  69. Hacker Tools Mac
  70. Hack Rom Tools
  71. Hacker Tools For Ios
  72. Pentest Tools Port Scanner
  73. Hack Apps
  74. Pentest Box Tools Download

Smart Contract Hacking Chapter 6 - Phishing Users With Malicious DAPS Via TX.Origin


Authorization on a smart contract can sometimes be a tricky endeavor. There are many things that are easily coded incorrectly, for example public functions, unpublished functions, delegate calls and tx.origin validations. If any of these are implemented incorrectly, then contracts are often left vulnerable to both direct and indirect attacks.

In this case, we will be talking about tx.origin which is an indirect attack method an attacker can utilize to bypass authorization based on the nuance of what is actually checked vs what the developer may think is checked when implementing require statements with tx.origin for authorization.

There are two different ways to check the address of who is making a call to a contract.

ü  Msg.sender

ü  Tx.Origin


While both of these could produce the same output when directly calling a contract, they may differ when there is another contract in the middle of the transaction. For example, if you play an online game which calls another contract to handle a payout transaction. When using a check with msg.sender, the winning payout would go to the games address that called the payout contract.

If the same address was checked with tx.origin on the payout contract, it would go all the way back to the original users address that processed the payout transaction on the game rather than the game contract making the call.


Man In the Middle Via tx.origin

This type of check is often misused when checking validation for authorization on smart contracts. When a tx.Origin check is used instead of msg.sender, this can leave a contract open to a man-in-the-middle (MITM) attack vector. Let's take a look at a visual representation of an attack, which will help put this into perspective. Then we will look at some code that implements this functionality.


In the below image we have:

ü  A user on the left

ü  An attacker's contract in the middle

ü  A target contract on the right


If the attacker were to call the target contract directly his authorization would be checked based on his personal address value regardless if the check is being performed via msg.sender or tx.orgin.  However, if the attacker created his own contract that called the target contract, the attacker could run a phishing campaign and social engineer the user into running functionality on the attacker's contract.

For example, sending a user to a game or accepting a payment for services and proxying the request to the target contract. If the user is social engineered into using the attackers contract, the attackers contract would make a transaction call to the target contract with which originates from the user's address via tx.origin. 

This is the exact point where things can go sideways.  If the target contract processes the transaction via msg.sender then the attackers contract would authorized as the attackers contract address. However, if the contract checks authorization via tx.origin than the attacker is accessing the target as the victims address and can bypass any authorization checks and simply process functionality as the victim user, to the attackers benefit.

This attack could be used to liquidate a user's account with a transfer function from the authorized user to the attacker's account. Or accessing forbidden functionality such as a Self-Destruct function linked to administrator only validation, or perhaps updating admin functionality to provide the attacker with full access to the contract. Much like social engineering in a standard network penetration test, this could be a wide scale phishing campaign to effect all standard users, or a spear phishing attack targeting an administrative user.

Regardless of the motivations of the attacker, there are many bad things that can happen. So let's take a look at a very simple example of tx.origin just so you see the difference between msg.sender and tx.origin.  We want to make sure you fully understand how this functionality is actually working so you can spot it during your testing before we exploit it.


Simple tx.origin Example Walkthrough:

Action Steps:

ü  Type out the following 2 contracts into Remix

ü  Deploy the HelloWorldTXOrigin contract first and copy its address value

ü  Place the address value in the proper location within CallHello contract and deploy it

ü  Review the code within CallHello and its usage of address validation

ü  Review the calls into the contract from HelloWorldTXOrigin that are effected by the address validation

ü  Try to reason based on what you learned above how this works and where and what the issues could be


1.    pragma solidity ^0.6.6;
2.   
3.    contract HelloWorldTXOrigin {
4.       
5.      function return_TX_Address() public returns(address){
6.           address myaddress = tx.origin;
7.           return myaddress; 
8.      }
9.      
10.   function return_MSG_Address() public returns(address){
11.       address myaddress = msg.sender;
12.         return myaddress; 
13.   }
14. }    


The code above for HelloWorldTXOrigin is extremely simple. All the code does is set a variable on lines 6 and 11 to the address calling the function and returns the value.  On line 6 it uses the tx.origin value and on line 11 it uses the msg.sender.

Now take a look at the following contract which calls the above contract to illustrate the difference between msg.sender and tx.origin values.  


1.    pragma solidity ^0.6.6;
2.   
3.    interface targetInterface {
4.      function return_TX_Address() external returns(address); 
5.      function return_MSG_Address() external returns(address);
6.    }
7.   
8.    contract Call_Hello {
9.      targetInterface helloInterface = targetInterface(ADD_Address_Here);
10. 
11.   function myTX ()  public returns (address){
12.        return helloInterface.return_TX_Address();
13.   }
14.    
15.   function myMSG ()  public returns (address){
16.        return helloInterface.return_MSG_Address();
17.   }
18.}


The Call_Hello contract above calls the HelloWorld contract via an interface defined on line 3 and initialized to a variable named helloInterface on line 9.

All this contract does is call functions from HelloWorld on lines 12 and 16 and returns the address values of tx.sender or msg.sender. Presumably this would be a random user that you social engineered into using this contract.

Action Steps:

ü  Select the first account in the dropdown list

ü  Compile and deploy HelloWorldTXOrigin.sol contract via Remix:

ü  Copy the address of the HelloWorldTXOrigin.sol contract

ü  Paste that address value into the target interface address placeholder

ü  Select the second account in the dropdown list

ü  Compile and deploy Call_Hello.sol

ü  Select any other account to simulate the victim account calling the attackers Call_Hello contract

ü  After each is pressed review the transaction output address and walk through in your head what you are reviewing before moving on.


If you performed the above action steps you would notice something similar to the following. First, I deploy my target contract with account one, which got deployed to the address:


ü  0xdCDB4db4a54F689ECC486d8BAcC08Cde4AC7FcA8


Next, I replace the address in the following line of the attackers phishing contract Call_Hello with the address from above, using the copy button to the right of the address in the above screenshot:


targetInterface helloInterface = targetInterface(0xdCDB4db4a54F689ECC486d8BAcC08Cde4AC7FcA8);


I then switch to Account two, and deploy the attackers phishing contract. This gives us the attackers contract address:  


ü  0x4e1426490dBfBa9110064fb912fe7221074cC0c9


Finally, I switch to the third account, ( my social engineered victim account) with the address:


ü  0x00bff3B21f6924D6e639Ce60e4Dac62Ec2c21269


If I then click the myMSG button on the attackers contract I should get the attackers address as the msg.sender resolves the address calling the contract. In this case I call the attackers contract but the attacker's contract is actually making the call to the target contract, so the msg.sender is the attackers contract even though or victim is the one clicking the button.  Indeed, this is true, shown below, the attackers contract address is returned when validated with msg.sender.

___________________________________________________________________________________


decoded output     {

 "0": "address: 0x4e1426490dBfBa9110064fb912fe7221074cC0c9"

}

___________________________________________________________________________________


Next I click the myTX button which should return the victims address from the 3rd account as the tx.origin check returns the original calling account of the user, not the attackers contract making the call. Indeed, this is true, shown below, the victims contract address is returned when validated with tx.origin.

___________________________________________________________________________________


decoded output     {

"0": "address: 0x00bff3B21f6924D6e639Ce60e4Dac62Ec2c21269"

}

___________________________________________________________________________________


I hope that clears up any confusion as to the difference between both msg.sender and tx.origin.  We will now take a look at a more comprehensive example with a bit of vulnerable code to put this into context and show how to bypass some controls using this attack method.

Action Steps:

ü  Review this code prior to reading the explanation.

ü  What is wrong with the logic in this contract?

ü  What would your path of exploitation be?

ü  What would the impact of this attack be?

ü  Type this code into remix and follow along with the walk through


Simple Example Video Walk Through: 


Vulnerable TX.Origin Example Walkthrough:

1.    pragma solidity ^0.6.6;
2.   
3.    contract BankOfEther {
4.      address owner;
5.      mapping (address =>uint) balances;
6.       
7.      constructor() public {
8.        owner = msg.sender;
9.      }
10.    
11.  function deposit() public payable{
12.    balances[msg.sender] = balances[msg.sender]+msg.value;     
13.   }
14.    
15.  function transferTo(address payable to, uint amount) public payable{
16.      require(tx.origin == owner);
17.      to.transfer(amount);
18.  }
19.    
20.  function changeOwner(address newOwner) public{
21.      require(tx.origin == owner);
22.      owner = newOwner;
23.                 }
24.    
25.  function kill() public {
26.      require(msg.sender == owner);
27.      selfdestruct(msg.sender);
28.  }
29.}


Above is an example of a contract which uses tx.origin to check for user authorization. On lines 16 and 21 you will see that in order to transfer contract funds or change the owner of the contract, you need to be the owner of the contract. This check uses the tx.origin value. The owner which is checked is set in the constructor on line 8 when the contract is deployed.

Also note that there is a kill function at line 25 using Solidity's built-in self-destruct function. This function will destroy the contract making it unusable and send any remaining contract ether to the address specified. This function is using authorization checks against the owner via the msg.sender rather than the tx.origin.


Action steps to familiarize yourself with the contract:

ü  Type the code above into Remix and deploy it

ü  Change the value field to 10 and the denomination to ether

ü  Deposit the 10 ether with the deposit function.

ü  Switch accounts and try to run changeOwner, Kill and transferTo functionality

ü  Try the same thing with the original account

ü  Try to deposit funds again


In your action steps and exploration of the contract you will notice that these functions do not run properly with the second account as you are not the owner of the contract when using the second account. You will also notice that these did run properly when used with the first account that deployed the contract as this user was set to the owner when deployed. You will also notice that when you ran the kill function it rendered the contract unusable and your funds were returned to your account from the initial deposit.

Now that we are familiar with the contracts functionality and we know that it is dangerously checking authorization using tx.origin  on both the transferTo and changeOwner functions. What would we do to attack this?

In order to formulate an attack, we will use a standard phishing style attack via social engineering. Exactly the same as if we were contracted to perform social engineering on a penetration test, however the malicious site that we send our victim communicates with our malicious smart contract on the backend as a proxy into the vulnerable contract for example using a decentralized web application (DAP) that makes web3.js calls. We used web3.js calls in an earlier chapter when directly making calls to a contract.

How we attack this would depend on our motivations as an attacker. We could simply trick the contract owner into running functionality on our malicious contract which then transfers all of the funds out of the contract to the attacker's wallet. The owner may not even notice this attack took place until he had issues with account balances. He may not even realize when and how it happened depending on how you orchestrate your attack. We could also take control of the whole contract and become the owner of the contract which would provide us with unfettered access to sensitive functionality at any time.

Let's take a look at a malicious smart contract that could transfer out all of the funds and additionally give use full administrative control of the contract. Generally, in a live attack scenario we would code a pretty looking DAP page around this attacker's contract with Web3.js much like in a phishing engagement.

1.  pragma solidity ^0.6.6;
2.   
3.  interface targetInterface {
4.  function transferTo(address payable to, uint amount)  payable external;
5.  function changeOwner(address newOwner) external;
6.  function kill() external;
7.  }
8.   
9.  contract PhishingBankOfEther {
10.  address payable attackerAddress;
11.    
12.  constructor() public {
13.     attackerAddress = msg.sender;
14.  }
15.    
16.  targetInterface bankInterface = targetInterface(ADDRESS);
17. 
18.  function test () payable public {
19.     bankInterface.transferTo(attackerAddress, 1 ether);
20.     bankInterface.changeOwner(attackerAddress);
21.  }
22.}


Most of this contract above is setting up the target interface, so this should be pretty easy to follow if you read through the section on Reentrancy where we setup an interface in our attacking contract.  But just to review an interface is a way that we can call functions from another contract via its address and function names. For example, on lines 3-6 we create an interface and simply copy paste the function definitions from our target contract into our interface definition. That's it.  And then we take that target interface we created and point it at the address of the target contract on line 16 with the name bankInterface. That is really the only thing we are doing for 75% of this contract. Nothing new or scary.

At this point we can use the bankInterface variable to access functionality within the target contract from our attacking contract.  Pretty simple right?  

Now the actual meat of this attacking contract is within lines 18-20 where we have a test function which calls the transferTo and changeOwner functions we do not have access to as a non-owner.


Action Steps:

ü  Re-deploy the target contract with your first account on remix

ü  Deposit 10 ether into the target contract

ü  Copy the address of the target contract via the copy button on the right side of the deployed contract

ü  Within the attacking contract replace the ADDRESS with the copied address from the target

ü  Switch to the second account in your list of accounts

ü  Deploy this contract and you will see a single function named test


Now as before with your attacker's account you cannot run functionality which performs authorization checks because the attackers address is not the owner, so running this test function which changes the owner and sends 1 ether will not work from the second account.  However, instead of our attacker running this functionality directly, the attacker would phish the Owner located on account one. The phish would use the attacker's contract which would perform the actions as the owner due to the incorrect check using tx.origin.


Action steps:

ü  Switch to the first account

ü  Try using the transfer function to verify that its working and that you're the owner

ü  Run the test function from the attacker's contract with account 1.

ü  Now try to use that send function again. Did it work?

ü  Try to use the kill function. Did that work?

ü  Now switch to the attackers account and use the send function. Did that work this time?

ü  Now kill the contract from the attackers account. What happened?


So, what happened when you used the test function from the attacker's contract?

The test function called the changeOwner and transferTo functions from the attacker's contract. But not as the attacker's address because authorization was checked via the Tx.origin which is the person calling the attacker's contract (account 1), not the attacker's contract address (account 2).

Even with the phishing contract if we were to call the kill function from the attacker's contract it would have failed because it uses the msg.sender. So, in order to execute kill, we had to use changeOwner and become the owner of the contract prior to calling the kill function.

As a result of phishing the owner into using the attacker's contract, the attacker is now the owner of this target contract. As such, the attacker actually can call the kill function directly without any issues and the original owner has been locked out of administrative functionality. 

Now in real life we, have a couple different options for attacking this user via a phishing attack over chat, email or even the phone.

Attack Options:

  1. Send a user a link to a website, perhaps a game they can play on Ethereum etc
  2. Sell the owner something and get the owner to send you any amount of Ether to your contract address. At this point you would have a fall back function which performs actions on the user's behalf simply by sending funds to our contracts account address and having the fallback function auto execute functionality with the owner's address.


I hope all of this makes sense. If you got stuck at any point during this walkthrough make sure to check out the video for a walkthrough of the lab and additional attack options.  


Phishing MITM Attack Walk Through: 


Smart Contract Hacking - 0x10 - Man In The Middle(MITM) Phishing Attacks Via TX.Origin Authorization.mp4 from Console Cowboys on Vimeo.


References

Github code for this chapter:  https://github.com/cclabsInc/BlockChainExploitation/tree/master/2020_BlockchainFreeCourse/Tx.Origin

More information


  1. How To Install Pentest Tools In Ubuntu
  2. Tools 4 Hack
  3. Blackhat Hacker Tools
  4. Best Hacking Tools 2019
  5. Hack Tools 2019
  6. Hacking Tools For Windows Free Download
  7. Pentest Tools Windows
  8. Pentest Recon Tools
  9. Pentest Tools List
  10. Hacking Tools Free Download
  11. Hack Tools
  12. Hack Tools For Mac
  13. Hacker Tools
  14. Kik Hack Tools
  15. Pentest Tools Download
  16. What Is Hacking Tools
  17. Beginner Hacker Tools
  18. Hack Tools Github
  19. Physical Pentest Tools
  20. Physical Pentest Tools
  21. Hackers Toolbox
  22. Hacking Tools Hardware
  23. Hack And Tools
  24. Hack Tools
  25. New Hack Tools
  26. Pentest Tools Online
  27. Hack Tool Apk No Root
  28. Pentest Tools Subdomain
  29. Growth Hacker Tools
  30. Hacking Tools For Games
  31. Pentest Recon Tools
  32. Hacker Tools Free Download
  33. Hack Apps
  34. Pentest Tools Website Vulnerability
  35. Hacking Tools Usb
  36. Nsa Hacker Tools
  37. Pentest Tools Website
  38. Bluetooth Hacking Tools Kali
  39. Ethical Hacker Tools
  40. Hacking Tools Software
  41. Best Hacking Tools 2019
  42. Hacker Tools List
  43. Pentest Tools Find Subdomains
  44. Hacker Tools Github
  45. Pentest Tools Alternative
  46. Hacker Tools List
  47. Easy Hack Tools
  48. Hack Tools 2019
  49. Install Pentest Tools Ubuntu
  50. Growth Hacker Tools
  51. Hacking Tools 2019
  52. Pentest Automation Tools
  53. Underground Hacker Sites
  54. Hacking Apps
  55. Hack Tools Mac
  56. Pentest Tools Url Fuzzer
  57. Hacker Tools
  58. Hack Rom Tools
  59. Pentest Reporting Tools
  60. Hack App
  61. Hacker Tools
  62. Pentest Tools For Mac
  63. Hacking Tools
  64. Hacker Tools 2019
  65. Pentest Tools Github
  66. Hacker Tools 2020
  67. Computer Hacker
  68. Hacking Tools For Windows 7
  69. Hacker Techniques Tools And Incident Handling
  70. Pentest Tools Alternative
  71. Hackers Toolbox
  72. Computer Hacker
  73. Pentest Tools Alternative
  74. Pentest Tools Free
  75. Pentest Tools Windows
  76. How To Hack
  77. Hacking Tools For Windows Free Download
  78. Nsa Hack Tools
  79. Hacking Tools Online
  80. Top Pentest Tools
  81. Pentest Box Tools Download
  82. Hacker Tools Apk Download
  83. Hacking Tools
  84. Hacker Tools List
  85. Hack Tools Online
  86. Pentest Tools Online
  87. Termux Hacking Tools 2019
  88. Pentest Tools Website Vulnerability
  89. Pentest Tools List
  90. Pentest Tools Url Fuzzer
  91. Hackrf Tools
  92. Hack Tool Apk No Root
  93. Hacks And Tools
  94. Hack Tool Apk No Root
  95. Hacking Tools Pc
  96. Hack App
  97. Growth Hacker Tools
  98. Pentest Reporting Tools
  99. Hackrf Tools
  100. Pentest Tools For Android
  101. Best Hacking Tools 2020
  102. How To Install Pentest Tools In Ubuntu
  103. Best Hacking Tools 2019
  104. Hacking Tools Name
  105. Hacking Tools Free Download
  106. Pentest Tools Review
  107. Hacker Tools Windows
  108. Hacker Tools Free
  109. Hack Rom Tools
  110. Nsa Hack Tools Download
  111. Pentest Tools Github
  112. Android Hack Tools Github
  113. Pentest Tools Alternative
  114. Hacking Tools Pc
  115. Hacking Apps
  116. Pentest Recon Tools
  117. Hacking Tools And Software
  118. Pentest Tools List
  119. Hacking Tools For Pc
  120. Wifi Hacker Tools For Windows
  121. Hacker Tools 2019
  122. Hacking Tools Kit
  123. Hacker Tools Mac
  124. Hack Tools For Games
  125. Hack App